How to Create a Layout for BloggerCMS
April 09, 2015 11:41 AMIn the last post, I shared a new layout based on Responsive template of Initializr. For the sake of this tutorial, let's see how we can convert this Initializr template into a BloggerCMS layout.
What You Need to Know
- Basics of HTML and CSS
- Basics of mustache template engine (see its docs) because BloggerCMS layouts are based on mustache. Even if you don't know it, you can follow along still because we show how you can use built-in layout variables to create your custom layout
Layout File Structure
If you look at the default layout folder, it contains these files and folders:
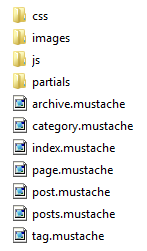
Here is what they mean:
- css - contains all CSS styles for the blog
- images - contains all images needed in the layout
- js - contains all javascript files needed in the layout
- partials - contains mustache partials (similar to PHP include files) such as header, sidebar, footer, etc
- archive.mustache - contains archive posts (Example)
- category.mustache - contains category posts (Example)
- index.mustache - contains home page posts (Example)
- page.mustache - contains page posts (Example)
- post.mustache - contains single post (Example)
- posts.mustache - contains all blog posts on single page (Example)
- tag.mustache - contains tag posts (Example)
Note: We are using mustache extension for files so that mustache template engine knows it. This means layout files should have mustache extension.
Here are few things to notice:
- When creating your custom layouts, you should follow the same naming for all *.mustache files present in the layout root folder. For example, you cannot say myarchive.mustache for archive.mustache.
- Layout must contain a required partials folder. Inside partials folder, you are not bound with naming convention eg you can name your mustache partials anything like header.mustache or myheader.mustache - any name you can use.
- BloggerCMS will automatically convert all your .mustache files into .html files
Layout Variables
In your custom layouts, you can use these mustache template variables:
Settings > General
{{settings}}- All settings of the blog{{settings.title}}- Title of the blog{{settings.tagline}}- Tagline of the blog{{settings.author}}- Author name of the blog{{settings.url}}- URL of the blog{{settings.disqus}}- Disqus shortname for commenting on posts{{settings.analytics}}- Google Analytics Tracking ID
Settings > Follow
{{follow}}- All follow data{{follow.twitter}}- Twitter URL{{follow.linkedin}}- Linkedin URL{{follow.github}}- Github URL{{follow.google}}- Google Plus URL{{follow.facebook}}- Facebook URL
Settings > Custom Values
{{customValues}}- All custom values data{{customValues.title}}- Title of custom value field{{customValues.value}}- Value of custom value field
Posts
{{posts}}- All posts of the blog{{homePosts}}- Home page posts of the blog. It will contain as many posts as defined in Number of Posts option in BloggerCMS settings.{{latestPosts}}- Latest 10 posts{{post}}- Single post data{{post.title}}- Title of the post{{post.tags}}- Tags of the post{{post.category}}- Category of the post{{post.body}}- Body of the post{{post.dated}}- Date post was published on{{post.slug}}- URL name for the post
Pages
{{pages}- All pages of the blog{{page}- Single page data{{page.title}- Title of page{{page.body}- Body of the page{{page.slug}- URL name for the page
Categories
{{categories}}- All categories of blog posts{{categoryPosts}}- All posts from a category
Archives
{{archives}}- All archives of blog posts{{archivePosts}}- All posts from an archive
Tags
{{tagsCloud}}- Tags cloud for all posts{{tagPosts}}- All posts from a tag
Creating Partials
Partials are files that can be included in other files such as header footer or any other piece of html that should appear in all pages of the blog.
Having above variables in place, we can easily construct a layout. Let's start.
Go to Initializr website and download their Responsive template by clicking on big orange color button. Once downloaded, extract contents of it and move to layouts folder of BloggerCMS. You will see it contains few folders and an index.html file.
First step is to create required folder partials inside downloaded initialzr folder. Once you have done that, let's create partials for the layout. If you open index.html file of initialzr template in editor of your choice, you would see it contains:
<!doctype html>
<html class="no-js" lang="">
    <head>
        <meta charset="utf-8">
        <meta http-equiv="X-UA-Compatible" content="IE=edge,chrome=1">
        <title></title>
        <meta name="description" content="">
        <meta name="viewport" content="width=device-width, initial-scale=1">

        <link rel="stylesheet" href="css/normalize.min.css">
        <link rel="stylesheet" href="css/main.css">

        <script src="js/vendor/modernizr-2.8.3-respond-1.4.2.min.js"></script>
    </head>
    <body>

        <div class="header-container">
            <header class="wrapper clearfix">
                <h1 class="title">h1.title</h1>
                <nav>
                    <ul>
                        <li><a href="#">nav ul li a</a></li>
                        <li><a href="#">nav ul li a</a></li>
                        <li><a href="#">nav ul li a</a></li>
                    </ul>
                </nav>
            </header>
        </div>

        <div class="main-container">
            <div class="main wrapper clearfix">

                <article>
                    <header>
                        <h1>article header h1</h1>
                        <p>Lorem ipsum dolor sit amet, consectetur adipiscing elit. Aliquam sodales urna non odio egestas tempor. Nunc vel vehicula ante. Etiam bibendum iaculis libero, eget molestie nisl pharetra in. In semper consequat est, eu porta velit mollis nec.</p>
                    </header>
                    <section>
                        <h2>article section h2</h2>
                        <p>Lorem ipsum dolor sit amet, consectetur adipiscing elit. Aliquam sodales urna non odio egestas tempor. Nunc vel vehicula ante. Etiam bibendum iaculis libero, eget molestie nisl pharetra in. In semper consequat est, eu porta velit mollis nec. Curabitur posuere enim eget turpis feugiat tempor. Etiam ullamcorper lorem dapibus velit suscipit ultrices. Proin in est sed erat facilisis pharetra.</p>
                    </section>
                    <footer>
                        <h3>article footer h3</h3>
                        <p>Lorem ipsum dolor sit amet, consectetur adipiscing elit. Aliquam sodales urna non odio egestas tempor. Nunc vel vehicula ante. Etiam bibendum iaculis libero, eget molestie nisl pharetra in. In semper consequat est, eu porta velit mollis nec. Curabitur posuere enim eget turpis feugiat tempor.</p>
                    </footer>
                </article>

                <aside>
                    <h3>aside</h3>
                    <p>Lorem ipsum dolor sit amet, consectetur adipiscing elit. Aliquam sodales urna non odio egestas tempor. Nunc vel vehicula ante. Etiam bibendum iaculis libero, eget molestie nisl pharetra in. In semper consequat est, eu porta velit mollis nec. Curabitur posuere enim eget turpis feugiat tempor. Etiam ullamcorper lorem dapibus velit suscipit ultrices.</p>
                </aside>

            </div> <!-- #main -->
        </div> <!-- #main-container -->

        <div class="footer-container">
            <footer class="wrapper">
                <h3>footer</h3>
            </footer>
        </div>

        <script src="//ajax.googleapis.com/ajax/libs/jquery/1.11.2/jquery.min.js"></script>
        <script>window.jQuery || document.write('<script src="js/vendor/jquery-1.11.2.min.js"><\/script>')</script>

        <script src="js/main.js"></script>
    </body>
</html>
Let's first create head.mustache (you can name it anything you want) that will contain head information we would want to inject in all pages of the blog. Create a file head.mustache inside partials folder and in it cut following piece of html from index.html file and paste in head.mustache file:
<!doctype html>
<html class="no-js" lang="">
    <head>
        <meta charset="utf-8">
        <meta http-equiv="X-UA-Compatible" content="IE=edge,chrome=1">
        <title></title>
        <meta name="description" content="">
        <meta name="viewport" content="width=device-width, initial-scale=1">

        <link rel="stylesheet" href="css/normalize.min.css">
        <link rel="stylesheet" href="css/main.css">

        <script src="js/vendor/modernizr-2.8.3-respond-1.4.2.min.js"></script>
    </head>
In above file, let's now fill in <title></title> tag with blog name and fix javascript and style paths with blog url using layout variables shown earlier:
<!doctype html>
  <html class="no-js" lang="">
      <head>
          <meta charset="utf-8">
          <meta http-equiv="X-UA-Compatible" content="IE=edge,chrome=1">
          <title>{{settings.title}}</title>
          <meta name="description" content="{{settings.tagline}}">
          <meta name="viewport" content="width=device-width, initial-scale=1">

          <link rel="stylesheet" href="{{settings.url}}/css/normalize.min.css">
          <link rel="stylesheet" href="{{settings.url}}/css/main.css">

          <script src="{{settings.url}}/js/vendor/modernizr-2.8.3-respond-1.4.2.min.js"></script>
      </head>
Since we cut above head section from index.html file, it should now look like:
<body>

    <div class="header-container">
        <header class="wrapper clearfix">
            <h1 class="title">h1.title</h1>
            <nav>
                <ul>
                    <li><a href="#">nav ul li a</a></li>
                    <li><a href="#">nav ul li a</a></li>
                    <li><a href="#">nav ul li a</a></li>
                </ul>
            </nav>
        </header>
    </div>

    <div class="main-container">
        <div class="main wrapper clearfix">

            <article>
                <header>
                    <h1>article header h1</h1>
                    <p>Lorem ipsum dolor sit amet, consectetur adipiscing elit. Aliquam sodales urna non odio egestas tempor. Nunc vel vehicula ante. Etiam bibendum iaculis libero, eget molestie nisl pharetra in. In semper consequat est, eu porta velit mollis nec.</p>
                </header>
                <section>
                    <h2>article section h2</h2>
                    <p>Lorem ipsum dolor sit amet, consectetur adipiscing elit. Aliquam sodales urna non odio egestas tempor. Nunc vel vehicula ante. Etiam bibendum iaculis libero, eget molestie nisl pharetra in. In semper consequat est, eu porta velit mollis nec. Curabitur posuere enim eget turpis feugiat tempor. Etiam ullamcorper lorem dapibus velit suscipit ultrices. Proin in est sed erat facilisis pharetra.</p>
                </section>
                <footer>
                    <h3>article footer h3</h3>
                    <p>Lorem ipsum dolor sit amet, consectetur adipiscing elit. Aliquam sodales urna non odio egestas tempor. Nunc vel vehicula ante. Etiam bibendum iaculis libero, eget molestie nisl pharetra in. In semper consequat est, eu porta velit mollis nec. Curabitur posuere enim eget turpis feugiat tempor.</p>
                </footer>
            </article>

            <aside>
                <h3>aside</h3>
                <p>Lorem ipsum dolor sit amet, consectetur adipiscing elit. Aliquam sodales urna non odio egestas tempor. Nunc vel vehicula ante. Etiam bibendum iaculis libero, eget molestie nisl pharetra in. In semper consequat est, eu porta velit mollis nec. Curabitur posuere enim eget turpis feugiat tempor. Etiam ullamcorper lorem dapibus velit suscipit ultrices.</p>
            </aside>

        </div> <!-- #main -->
    </div> <!-- #main-container -->

    <div class="footer-container">
        <footer class="wrapper">
            <h3>footer</h3>
        </footer>
    </div>

    <script src="//ajax.googleapis.com/ajax/libs/jquery/1.11.2/jquery.min.js"></script>
    <script>window.jQuery || document.write('<script src="js/vendor/jquery-1.11.2.min.js"><\/script>')</script>

    <script src="js/main.js"></script>
</body>
</html>
Let's now cut header navigation section from initializr index.html file, it you notice it is contained in <div class="header-container">. Create a file partials>header.mustache and paste:
<div class="header-container">
    <header class="wrapper clearfix">
        <h1 class="title">h1.title</h1>
        <nav>
            <ul>
                <li><a href="#">nav ul li a</a></li>
                <li><a href="#">nav ul li a</a></li>
                <li><a href="#">nav ul li a</a></li>
            </ul>
        </nav>
    </header>
</div>
The index.html file of initialzr should now appear like:
<body>

    <div class="main-container">
        <div class="main wrapper clearfix">

            <article>
                <header>
                    <h1>article header h1</h1>
                    <p>Lorem ipsum dolor sit amet, consectetur adipiscing elit. Aliquam sodales urna non odio egestas tempor. Nunc vel vehicula ante. Etiam bibendum iaculis libero, eget molestie nisl pharetra in. In semper consequat est, eu porta velit mollis nec.</p>
                </header>
                <section>
                    <h2>article section h2</h2>
                    <p>Lorem ipsum dolor sit amet, consectetur adipiscing elit. Aliquam sodales urna non odio egestas tempor. Nunc vel vehicula ante. Etiam bibendum iaculis libero, eget molestie nisl pharetra in. In semper consequat est, eu porta velit mollis nec. Curabitur posuere enim eget turpis feugiat tempor. Etiam ullamcorper lorem dapibus velit suscipit ultrices. Proin in est sed erat facilisis pharetra.</p>
                </section>
                <section>
                    <h2>article section h2</h2>
                    <p>Lorem ipsum dolor sit amet, consectetur adipiscing elit. Aliquam sodales urna non odio egestas tempor. Nunc vel vehicula ante. Etiam bibendum iaculis libero, eget molestie nisl pharetra in. In semper consequat est, eu porta velit mollis nec. Curabitur posuere enim eget turpis feugiat tempor. Etiam ullamcorper lorem dapibus velit suscipit ultrices. Proin in est sed erat facilisis pharetra.</p>
                </section>
                <footer>
                    <h3>article footer h3</h3>
                    <p>Lorem ipsum dolor sit amet, consectetur adipiscing elit. Aliquam sodales urna non odio egestas tempor. Nunc vel vehicula ante. Etiam bibendum iaculis libero, eget molestie nisl pharetra in. In semper consequat est, eu porta velit mollis nec. Curabitur posuere enim eget turpis feugiat tempor.</p>
                </footer>
            </article>

            <aside>
                <h3>aside</h3>
                <p>Lorem ipsum dolor sit amet, consectetur adipiscing elit. Aliquam sodales urna non odio egestas tempor. Nunc vel vehicula ante. Etiam bibendum iaculis libero, eget molestie nisl pharetra in. In semper consequat est, eu porta velit mollis nec. Curabitur posuere enim eget turpis feugiat tempor. Etiam ullamcorper lorem dapibus velit suscipit ultrices.</p>
            </aside>

        </div> <!-- #main -->
    </div> <!-- #main-container -->

    <div class="footer-container">
        <footer class="wrapper">
            <h3>footer</h3>
        </footer>
    </div>

    <script src="//ajax.googleapis.com/ajax/libs/jquery/1.11.2/jquery.min.js"></script>
    <script>window.jQuery || document.write('<script src="js/vendor/jquery-1.11.2.min.js"><\/script>')</script>

    <script src="js/main.js"></script>
</body>
</html>
Let's now create partial for footer. From index.html file cut everything starting from <div class="footer-container">:
<div class="footer-container">
        <footer class="wrapper">
            <h3>footer</h3>
        </footer>
    </div>

    <script src="//ajax.googleapis.com/ajax/libs/jquery/1.11.2/jquery.min.js"></script>
    <script>window.jQuery || document.write('<script src="js/vendor/jquery-1.11.2.min.js"><\/script>')</script>

    <script src="js/main.js"></script>
</body>
</html>
Save above in partials>footer.mustache file. Let's now fix paths of javascript files using {{settings.url}} variable and save the file:
<div class="footer-container">
        <footer class="wrapper">
            <h3>footer</h3>
        </footer>
    </div>

    <script src="//ajax.googleapis.com/ajax/libs/jquery/1.11.2/jquery.min.js"></script>
    <script>window.jQuery || document.write('<script src="{{settings.url}}js/vendor/jquery-1.11.2.min.js"><\/script>')</script>

    <script src="{{settings.url}}js/main.js"></script>
</body>
</html>
The index.html file should now look like:
<body>

    <div class="main-container">
        <div class="main wrapper clearfix">
            <article>
                <header>
                    <h1>article header h1</h1>
                    <p>Lorem ipsum dolor sit amet, consectetur adipiscing elit. Aliquam sodales urna non odio egestas tempor. Nunc vel vehicula ante. Etiam bibendum iaculis libero, eget molestie nisl pharetra in. In semper consequat est, eu porta velit mollis nec.</p>
                </header>
                <section>
                    <h2>article section h2</h2>
                    <p>Lorem ipsum dolor sit amet, consectetur adipiscing elit. Aliquam sodales urna non odio egestas tempor. Nunc vel vehicula ante. Etiam bibendum iaculis libero, eget molestie nisl pharetra in. In semper consequat est, eu porta velit mollis nec. Curabitur posuere enim eget turpis feugiat tempor. Etiam ullamcorper lorem dapibus velit suscipit ultrices. Proin in est sed erat facilisis pharetra.</p>
                </section>
                <section>
                    <h2>article section h2</h2>
                    <p>Lorem ipsum dolor sit amet, consectetur adipiscing elit. Aliquam sodales urna non odio egestas tempor. Nunc vel vehicula ante. Etiam bibendum iaculis libero, eget molestie nisl pharetra in. In semper consequat est, eu porta velit mollis nec. Curabitur posuere enim eget turpis feugiat tempor. Etiam ullamcorper lorem dapibus velit suscipit ultrices. Proin in est sed erat facilisis pharetra.</p>
                </section>
                <footer>
                    <h3>article footer h3</h3>
                    <p>Lorem ipsum dolor sit amet, consectetur adipiscing elit. Aliquam sodales urna non odio egestas tempor. Nunc vel vehicula ante. Etiam bibendum iaculis libero, eget molestie nisl pharetra in. In semper consequat est, eu porta velit mollis nec. Curabitur posuere enim eget turpis feugiat tempor.</p>
                </footer>
            </article>

            <aside>
                <h3>aside</h3>
                <p>Lorem ipsum dolor sit amet, consectetur adipiscing elit. Aliquam sodales urna non odio egestas tempor. Nunc vel vehicula ante. Etiam bibendum iaculis libero, eget molestie nisl pharetra in. In semper consequat est, eu porta velit mollis nec. Curabitur posuere enim eget turpis feugiat tempor. Etiam ullamcorper lorem dapibus velit suscipit ultrices.</p>
            </aside>

        </div> <!-- #main -->
    </div> <!-- #main-container -->
Let's now create partial for sidebar. You would notice sidebar appears in <aside> tag in index.html file.
<aside>
  <h3>aside</h3>
  <p>Lorem ipsum dolor sit amet, consectetur adipiscing elit. Aliquam sodales urna non odio egestas tempor. Nunc vel vehicula ante. Etiam bibendum iaculis libero, eget molestie nisl pharetra in. In semper consequat est, eu porta velit mollis nec. Curabitur posuere enim eget turpis feugiat tempor. Etiam ullamcorper lorem dapibus velit suscipit ultrices.</p>
</aside>
Cut it and paste into new file partials>side.mustache and save the file and the index.html file should now contain:
<body>

    <div class="main-container">
        <div class="main wrapper clearfix">
            <article>
                <header>
                    <h1>article header h1</h1>
                    <p>Lorem ipsum dolor sit amet, consectetur adipiscing elit. Aliquam sodales urna non odio egestas tempor. Nunc vel vehicula ante. Etiam bibendum iaculis libero, eget molestie nisl pharetra in. In semper consequat est, eu porta velit mollis nec.</p>
                </header>
                <section>
                    <h2>article section h2</h2>
                    <p>Lorem ipsum dolor sit amet, consectetur adipiscing elit. Aliquam sodales urna non odio egestas tempor. Nunc vel vehicula ante. Etiam bibendum iaculis libero, eget molestie nisl pharetra in. In semper consequat est, eu porta velit mollis nec. Curabitur posuere enim eget turpis feugiat tempor. Etiam ullamcorper lorem dapibus velit suscipit ultrices. Proin in est sed erat facilisis pharetra.</p>
                </section>
                <section>
                    <h2>article section h2</h2>
                    <p>Lorem ipsum dolor sit amet, consectetur adipiscing elit. Aliquam sodales urna non odio egestas tempor. Nunc vel vehicula ante. Etiam bibendum iaculis libero, eget molestie nisl pharetra in. In semper consequat est, eu porta velit mollis nec. Curabitur posuere enim eget turpis feugiat tempor. Etiam ullamcorper lorem dapibus velit suscipit ultrices. Proin in est sed erat facilisis pharetra.</p>
                </section>
                <footer>
                    <h3>article footer h3</h3>
                    <p>Lorem ipsum dolor sit amet, consectetur adipiscing elit. Aliquam sodales urna non odio egestas tempor. Nunc vel vehicula ante. Etiam bibendum iaculis libero, eget molestie nisl pharetra in. In semper consequat est, eu porta velit mollis nec. Curabitur posuere enim eget turpis feugiat tempor.</p>
                </footer>
            </article>

        </div> <!-- #main -->
    </div> <!-- #main-container -->
From the index.html file, we see that <article> tag is where our posts or pages will go. Create a file partials>article.mustache and paste in it:
<header>
  <h1>article header h1</h1>
  <p>Lorem ipsum dolor sit amet, consectetur adipiscing elit. Aliquam sodales urna non odio egestas tempor. Nunc vel vehicula ante. Etiam bibendum iaculis libero, eget molestie nisl pharetra in. In semper consequat est, eu porta velit mollis nec.</p>
</header>
<section>
  <h2>article section h2</h2>
  <p>Lorem ipsum dolor sit amet, consectetur adipiscing elit. Aliquam sodales urna non odio egestas tempor. Nunc vel vehicula ante. Etiam bibendum iaculis libero, eget molestie nisl pharetra in. In semper consequat est, eu porta velit mollis nec. Curabitur posuere enim eget turpis feugiat tempor. Etiam ullamcorper lorem dapibus velit suscipit ultrices. Proin in est sed erat facilisis pharetra.</p>
</section>
The index.html should now be:
<body>

    <div class="main-container">
        <div class="main wrapper clearfix">
            <article>

            </article>

        </div> <!-- #main -->
    </div> <!-- #main-container -->
As you can see we have moved most of the repeatable stuff from index.html file in their own files and that's what index.html file contains in the end. Let's now include our partials we created so far in this index.html file, those should be specified exactly at their locations we cut them from.
To include a partial file in other file, you can use {{> name}} syntax. For example {{> head}} will include partials/head.mustache file into another file. Therefore let's modify index.html file to include all our partials in it:
{{> head}}

<body>

  {{> header}}

  <div class="main-container">
    <div class="main wrapper clearfix">
      <article>

      </article>

      {{> side}}

    </div> <!-- #main -->
  </div> <!-- #main-container -->

{{> footer}}
Now BloggerCMS will automatically inject all partials in that file and also replace layout variables with their actual values. For example {{settings.title}} will be replaced by actual blog title. As noted earlier, mustache template engine only recognizes files with mustache extension, so rename the index.html file as index.mustache and this will be the home page of the blog.
Creating Layout Files
Homepage
By now we already have index.mustache file which will be used for the homepage of the blog. Let's modify it to add blog posts and also include a link to all posts page: (as seen on home of this blog button called View All Posts)
{{> head}}
<body>

{{> header}}

<div class="main-container">
    <div class="main wrapper clearfix">
        <article>
            {{#homePosts}}
                {{> article}}
            {{/homePosts}}
            <br>
            <a href="posts.html">→ View All Posts</a>
        </article>

        {{> side}}
    </div>
    <!-- #main -->
</div>
<!-- #main-container -->

{{> footer}}
In above code, you would notice that:
{{#homePosts}}
    {{> article}}
{{/homePosts}}
If you look at Layout Variables above, we come to now that {{homePosts}} contains all posts for the home page. You would notice special characters # and / before it. They mark start and end of mustache variable similar to HTML tags. It serves two purposes:
- Iterate over specified variable data (in this case, home page blog posts)
- Show data only if it is present. If no data will be present in variable, stuff inside them won't be shown
So that's it for the home page.
All Posts Page
Create posts.mustache file inside initializr layout folder and paste:
{{> head}}
<body>

{{> header}}

<div class="main-container">
    <div class="main wrapper clearfix">
        <article>
            {{#posts}}
                {{> article}}
            {{/posts}}
        </article>

        {{> side}}
    </div>
    <!-- #main -->
</div>
<!-- #main-container -->

{{> footer}}
This time we are using {{posts}} variable since it contains all posts of the blog and this posts.mustache file will be converted into posts.html by BloggerCMS where users will be able to see all blog posts.
Archives Page
Create archive.mustache file and paste:
{{> head}}
<body>

{{> header}}

<div class="main-container">
    <div class="main wrapper clearfix">
        <article>
            <h1>Monthly Posts</h1>
            <hr/>
            <br/>

            {{#archivePosts}}
                {{> article}}
            {{/archivePosts}}
        </article>

        {{> side}}
    </div>
    <!-- #main -->
</div>
<!-- #main-container -->

{{> footer}}
As noted, archives page data comes from {{archivePosts}} variable.
Category Page
Create a file category.mustache and paste:
{{> head}}
<body>

{{> header}}

<div class="main-container">
    <div class="main wrapper clearfix">
        <article>
            <h1>Category Posts</h1>
            <hr/>
            <br/>

            {{#categoryPosts}}
                {{> article}}
            {{/categoryPosts}}
        </article>

        {{> side}}
    </div>
    <!-- #main -->
</div>
<!-- #main-container -->

{{> footer}}
Tags Page
Create a file tag.mustache and paste:
{{> head}}
<body>

{{> header}}

<div class="main-container">
    <div class="main wrapper clearfix">
        <article>
            <h1>Tag Posts</h1>
            <hr/>
            <br/>

            {{#tagPosts}}
                {{> article}}
            {{/tagPosts}}
        </article>

        {{> side}}
    </div>
    <!-- #main -->
</div>
<!-- #main-container -->

{{> footer}}
Page
Create a file page.mustache and paste:
{{> head}}
<body>

{{> header}}

    <div class="main-container">
        <div class="main wrapper clearfix">
            <article>
                <header>
                    <h1>{{page.title}}</h1>
                </header>

                <section>
                    <hr>
                    <p class="page-content">{{{page.body}}}</p>
                </section>
            </article>

            {{> side}}
        </div>
        <!-- #main -->
    </div>
    <!-- #main-container -->

    {{> footer}}
As noted above in Layout Variables section, {{page}} variable contains single page data and hence we can use {{page.title}} to get title or {{page.body}}
Single Post Page
Create a file post.mustache and paste:
{{> head}}
<body>

{{> header}}

    <div class="main-container">
        <div class="main wrapper clearfix">
            <article>
                <header>
                    <h1>{{post.title}}</h1>
                </header>

                <section>
                    <hr>
                    <p class="page-content">{{{post.body}}}</p>
                </section>
            </article>

            {{> side}}
        </div>
        <!-- #main -->
    </div>
    <!-- #main-container -->

    {{> footer}}
But we also need to add date, category and tags information, so modify it like:
{{> head}}
<body>

{{> header}}

<div class="main-container">
    <div class="main wrapper clearfix">
        <article>
            <header>
                <h1>{{post.title}}</h1>
                <span class="time">{{post.dated}}</span>
            </header>

            <section>
                <hr>
                <p class="post-content">{{{post.body}}}</p>
                <br/>

                <div class="post-info">
                    {{#post.category}}
                        <strong>Category:</strong>
                        <a class="lowercase" href="{{settings.url}}/category/{{category}}.html">{{post.category}}</a>

                    {{/post.category}}

                    <strong>Tags:</strong>

                    {{#post.tags}}
                        <a class="lowercase" href="{{settings.url}}/tag/{{.}}.html">{{.}}</a>
                    {{/post.tags}}
                </div>
            </section>
        </article>

        {{> side}}
    </div>
    <!-- #main -->
</div>
<!-- #main-container -->

{{> footer}}
You would notice partials>article.mustache file is used in various files, so let's update it. Modify it so it contains:
<header>
    <h1><a href="{{settings.url}}/post/{{slug}}.html">{{title}}</a></h1>
    <span class="time">{{dated}}</span>
</header>

{{#showbody}}
    <section>
        <hr>
        <p class="post-content">{{{body}}}</p>
        <br/>

        <div class="post-info">
            {{#category}}
                <strong>Category:</strong>
                <a class="lowercase" href="{{settings.url}}/category/{{category}}.html">{{category}}</a>

            {{/category}}

            <strong>Tags:</strong>

            {{#tags}}
                <a class="lowercase" href="{{settings.url}}/tag/{{.}}.html">{{.}}</a>
            {{/tags}}
        </div>

    </section>
{{/showbody}}
<hr>
Here {{showbody}} variable is used to dictate whether or not show post body based on Display Post Titles Only option in Settings > General Setttings.
Let's now modify header.mustache file so it show blog name as well as links for created pages:
<div class="header-container">
    <header class="wrapper clearfix">
        <h1 class="title">
            <a href="{{settings.url}}/index.html" class="navbar-brand">{{settings.title}}</a>
        </h1>

        <nav>
            <ul class="nav navbar-nav page-links">
                {{#pages}}
                    <li><a href="{{settings.url}}/page/{{slug}}.html">{{title}}</a></li>
                {{/pages}}
            </ul>
        </nav>

    </header>
</div>
Let's finally update the sidebar so it contains recent posts, categories, archives, tags cloud, follow information and custom values:
{{#follow}}
    <aside>
        <h3>Follow Me</h3>

        <a target="_blank" href="{{settings.url}}/rss.xml"><img src="{{settings.url}}/img/rss.png" width="40" height="40"></a>

        {{#twitter}}
            <a target="_blank" href="{{.}}"><img src="{{settings.url}}/img/twitter.png" width="40" height="40"></a>
        {{/twitter}}
        {{#linkedin}}
            <a target="_blank" href="{{.}}"><img src="{{settings.url}}/img/linkedin.png" width="40" height="40"></a>
        {{/linkedin}}
        {{#github}}
            <a target="_blank" href="{{.}}"><img src="{{settings.url}}/img/github.png" width="40" height="40"></a>
        {{/github}}
        {{#google}}
            <a target="_blank" href="{{.}}"><img src="{{settings.url}}/img/google-plus.png" width="40" height="40"></a>
        {{/google}}
        {{#facebook}}
            <a target="_blank" href="{{.}}"><img src="{{settings.url}}/img/facebook.png" width="40" height="40"></a>
        {{/facebook}}

    </aside>
{{/follow}}

{{#customValues}}
    <aside>
        <h3>{{title}}</h3>

        <p>{{{value}}}</p>
    </aside>
{{/customValues}}

<aside>
    <h3>Latest Posts</h3>

    <ul class="list-group">
        {{#latestPosts}}
            <li><a href="{{settings.url}}/post/{{slug}}.html">{{title}}</a></li>
        {{/latestPosts}}
    </ul>
</aside>

<aside>
    <h3>Categories</h3>

    <ul class="list-group">
        {{#categories}}
            <li><a class="lowercase" href="{{settings.url}}/category/{{.}}.html">{{.}}</a></li>
        {{/categories}}
    </ul>
</aside>

{{#archives}}
    <aside>
        <h3>Archives</h3>

        <p>{{{.}}}</p>
    </aside>
{{/archives}}

{{#tagsCloud}}
    <aside>
        <h3>Tags Cloud</h3>

        <ul class="list-inline">
            {{{.}}}
        </ul>
    </aside>
{{/tagsCloud}}
As you can see, we have used various Layout Variables to construct sidebar sections.
Few things to notice here:
- For follow section, you will need to upload relevant social icon images for twitter, facebook, etc
- To iterate over flat values array, you would use
{{.}}, this will automatically print current value inside variable - To show html tags un-escaped, you need to use three curly braces notation eg
{{{.}}} - Whole blog data is contained in admin/data/blog.json file which is then copied into public/data/blog.json file by BloggerCMS
Finally to apply your new layout, from Settings > General Settings, specify initializr as name for the Layout Name option and hit the Generate Blog button on the top right.
And that concludes the creation of a template, of course explaining each and everything takes bit of time but once you know basics of HTML and mustache template, you should be able to create a layout fast.